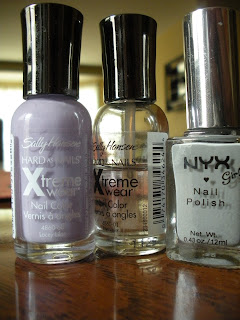
In this look I used Sally Hansen Hard as nails Xtreme wear nail color in Lacey Lilac (#270) and invisible (#100) as my base and top coat. I also used NYX Perfect Gray (#171) as my accent.
This was my first attempt at polishing my own nails with a design this intricate, I think I did a pretty good job...
What you will need:
-Clear tape
-two or more nail polish colors
-finger nail polish and Q-tips for clean up :)
Step By Step:
1. Start with Clean nails and apply a thin base coat.
2. After this dries, add which ever color you want to be the base coat. Since there are only two colors it doesn't really matter which you chose. I Polished all of my nails with Lacey Lilac.
3. Wait 5-10 minutes, or however long it will take your nails to dry.
4. After the base color has dried take a piece or clear tape, about and inch long and apply it to your nails diagonally.
***I stuck the tape to my bare leg twice before applying it to my nail. I found that this made the tape less sticky which helped because it was peeling off my base coat. Also I alternated my diagonal colors, purple on top to gray on top. You can do this, switch it up with different colors or keep it uniformed throughout***
5. After applying the tape polish the untapped portion of your nail with the second color and allow to dry for at least 5 minutes! You don't want to pull it off while the second color is still wet because it will bleed!6. remove the tape and continue to dry.
7. repeat for all of your nails and add your clear top coat. *For a special touch I added a purple flower rhinestone to my pinkie fingers. I just used the clear polish to apply it, no glue! I got the rhinestones from CVS, the sell them where ever nail polish is sold. *
Hopefully this is helpful. Try it out and let me know how your nail turn out!


No comments:
Post a Comment